Howdy!
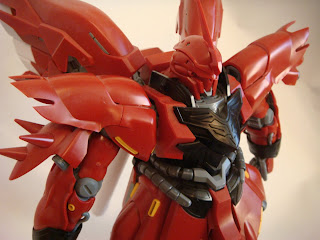
Needless to say..... I am back after a loooooong absence in the studio. I have yet another move ahead of me (Germany this time) so I wanted to finish MG Sinanju that I've been working on for awhile now.
You can find the photo review of model from dalong.net here
Logistics
Gunpla
1. MSN-06S MG Sinanju Ver. Ka from Hobbywave.com = $79.16
Detail parts
1. HQO metal detail parts (Energy tube) = $13 (from e-bay)
Paint and Misc. (All supplies were purchased from hobbywave.com)
1. Mr Color Super Metallic - Chrome Silver (SM 06) x 2 = $26
2. Mr Color Super Metallic – Iron x 1 = $12.99
3. Mr. Color 47 - Clear Red (Gloss/Primary) x 4 = $12
4. Mr. Color 109 - Character Yellow (Semi-Gloss/Primary) x 1 = $2.99
5. Testors Enamel: 1147 Gloss Black = $ 1.99
6. Mr. Surfacer 1000 x 1 = $11
7. Mr. Topcoat (Gloss) x = $10
8. Hand drill, Super glue, Gunpla Nipper, and other necessary tools
Kit review
This is a fantastic kit. However, Simple straight build does not bring out its true beauty because it has very decorative yellow (gold) emblems all over its body. In addition, Bandai released the titanium version (which is shiny metallic version of the same kit plus about $50 more expensive) but it is horrible because the spur marks show even more on the metallic coating kits.
Here are some before pictures.


Build Concept
There are so many Sinanju works out on the net. People have become very creative with this kit. I wanted to stay with basics, something that is very metallic (without ugly spur marks) with bright yellow highlight emblems. Lastly, I wanted to have some metal detail parts but not too much to be ridiculous. Overall, I wanted nice, “just out of the mobile suit hangar" look for this particular project.
There are so many Sinanju works out on the net. People have become very creative with this kit. I wanted to stay with basics, something that is very metallic (without ugly spur marks) with bright yellow highlight emblems. Lastly, I wanted to have some metal detail parts but not too much to be ridiculous. Overall, I wanted nice, “just out of the mobile suit hangar" look for this particular project.
Work In Progress/Complete
1. First thing I needed to do was sanding all outer armors. Sanding may not be necessary every time one paints the model but I wanted to make sure the surface is in perfect condition and have smooth surface for the metal paint application. After sanding, all external armor pieces were washed with light soapy water to remove dusty particals. After wash, all parts were air dried while resting on top of a towel.

 2. Second, I primed all armors pieces using Mr. Surfacer 1000. This gave very clean and good surface for metallic paints to attach.
 3. Next, I applied two coats of Mr Color Super Metallic - Chrome Silver (SM 06). This is fantastic paint (also very expensive) it literally made the plastic armors look as if it they were made out of chrome.


4. Finally I’ve applied two coats of Mr. Color Clear Red. This gives very shiny and strong red color with metallic look (metallic look is actually from the chrome under coat. The clear red is see through so the chrome is showing, creating the beautiful effect of shiny red metal look.)


5. The inner frame was also painted with Mr Color Super Metallic Iron. This gave “heavy and dark” feel to the frame. You can see the difference before and after (before pictures were obtained from dalong.net). You can also the see the difference in the metal tone between the leg and one of the armor pieces before it was painted with clear red.


6. Here are finished shots. All emblems were done using washing method. There are three steps to the method. First, painted all parts with Mr. Color 109 - Character Yellow (Semi-Gloss/Primary). Second, cover the entire piece using black enamel paint. Third, wash (clean) the “would be” yellow area with enamel thinner to reveal the emblems.


Well, that's all! Thanks for looking.
Zebu


1 comment:
Hello Zebu,
Wow..very nice & I like it..:)
Just want to know,do u use airbrush spray or normal paint by hand for the metallic chrome & clear red?I wanna try to make it on my first sinanju project.Appreciate if u can advice me..*_*
Post a Comment