Howdy!
My next project (1 OCT to 11 OCT) was "ZGMF-X42S Destiny Gundam". Some asked me if I paint my models every time… well it depends. I do paint my gunpla if I have color scheme in mind. However, I believe it is not necessary to repaint the model kit for repaint sake especially if the original color scheme of model kit is good enough.
Here I’ve worked on "ZGMF-X42S Destiny Gundam" with partial painting (brush) and detailing to produce very “presentable” display item. Enjoy!
Logistics
Gunpla
1. ZGMF-X42S Destiny Gundam normal version from Hobbywave = $52.95
Detail parts
1. Silver plated Jewelry Connection from J.C moore = $2
2. Stainless Steel balls 0.7mm = $5.99
3. Metal Screw Pins = $4.99
4. Gunpla Temple Metal Detail kit ER + SC = $13.95
5. Gunpla Temple Metal Detail Kit T5 = $13.95
Paint and Misc.
1. Testors Enamel: 1180 Steel = $1.99
2. Testors Enamel: 1146 Silver = $1.99
3. Testors Enamel: 1151 Copper = $1.99
4. Testors Enamel: 1144 Gold = $ 1.99
5. Perl EX pigments: 663 Silver = $4.99
6. Hand drill, Super glue, Gunpla Nipper, and other necessary tools
Kit Review
ZGMF-X42S Destiny Gundam is a great kit. Pictures below from dalong.net shows straight build of the kit (no paint, sticker/decal, panel line and/or paint) and detail of inner frame.


 Paint
PaintWhile I did like the original paint scheme of Destiny Gundam, I did not like the fact that it was very glossy (Miserable fact of most plastic injection kits…. It is plasticky).

 For most people, this very fact would cause them to repaint the kit to give very flat color as shown here in HG 1/100 Destiny Gundam by Japanese modeler. Well, the good news is that you can achieve this flat color feel without painting by applying some Krylon" Matte finish sealer (Shown in my earlier Zaku 205: Arctic Warfare post). I used same technique I utilized to repaint the inner frame of Strike Freedom Gundam.
 Here are the detail shots of the parts after sealer has been applied.

 *Important Tip*
1. Draw in ALL PANEL LINES before applying the seal!!!
2. Apply 2-3 light coats rather than one heavy coats of sealer.


 Here is comparison shot of wing unit with and without the seal coats (Click to view larger photo).
*Useful Tip*
Use zip lock bag and place all parts with label. This will save tone of time later (especially when you have to figure out parts for left and right).

Inner Frame Paint/Detailing
Destiny Gundam has very detailed inner frame.


 *Useful Tip*
Examine the frame thoroughly and make note regarding joints/parts/location that requires special attention when painting (i.e. location where paint would likely cause mobility issues and/or paint that will be scratched away due to joint movements).


 I used "Dry brush" technique using misture of Testors Enamel: 1180 and Perl EX pigments: 663 Silver.
Here are some detail shots
 Note how it really gave the "Metal feel".
 Next I added additional detail painting using Testors Enamel: 1151 Copper.

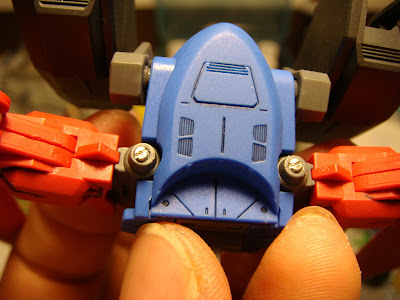
Next, I brush painted the Hydraulics located on the ankle with Testors Enamel: 1146 Silver and Testors Enamel: 1144 Gold.


Next, I brush painted the Calf Thruster with red and sliver.

Here are some finished inner frame shots.


Detailing
I got a pack of “Silver plated Jewelry Connection” from J.C Moore art store. These are about 2mm in diameter and perfect to give metal Thruster look all over gunpla.


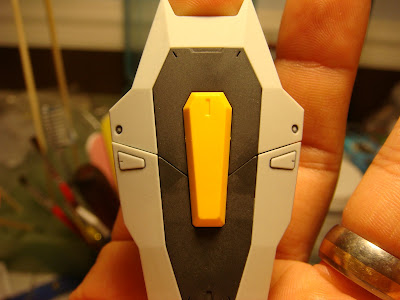
Next, I painted the missing details on the wing (Grey and sliver for the wing thrusters).

 Next were the wing Hydraulics.

 And Wing vent units (I think these are the vent unit....)


Here, I tried something new.
I got a pack of “Silver plated Jewelry Connection” from J.C Moore art store. These are about 2mm in diameter and perfect to give metal Thruster look all over gunpla.


Of course I had to enhance Destiny Gundam's unique hand beam :)


Wing unit Paint/Detailing
I used Metal Detail Kit T5 from Gunpla Temple (purchased from hobbywave.com) to upgrade the burner on the Wing Unit.


Next, I painted the missing details on the wing (Grey and sliver for the wing thrusters).

 Next were the wing Hydraulics.
 And Wing vent units (I think these are the vent unit....)

Wing unit painting is done!!!

Now, I added some more detail parts to enhance the look. Here, I used metal screws to give more "mechanical looks"


Here, I tried something new.
I drilled some holes on the part above the Wing Burners to give some "Gundam Evolve" look :)


Weapon Paint/Detailing


Finally (for wing unit at least) I added some 0.7 mm Steel balls on the wing (near the spur marks) for some added fun.


Weapon Paint/Detailing
I did two simple brush paitings for the gaint sword unit.
1. Applied silver on the blade
2. Applied white highlights on the beam saber.


I noticed some obvious details were missing from the original kits weapon system so I used Metal Detail kit ER + SC from Gunpla Temple (purchased from hobbywave.com) at the location (red circle).


I first brush painted the pilot as directed in the manual.


Body Paint/Detailing
I first brush painted the pilot as directed in the manual.


Finally (for real), I applied the metal detail parts to the body.


 *Note*


 *Note*
I also drilled right below the Calf thrusters (same as the ones done for the Wing Unit) to add that "evolve" look.


The Decal/sticker and VERY LIGHT weathering was applied as the last step.
The finished/action shots will be posted later.
Thanks for reading!!!
Zebu
2 comments:
Really love your metal parts detailing!
The jewel connectors, are they expensive? I'm thinking of using one too.
Adding you to my blogroll ^_^
Um sorry I saw the price of each metal parts already >.<
Where did you buy them? I really want to try those.
Post a Comment